When beginners ask which yoga poses “make us feel good” the question is fundamentally about two physiological processes: the mechanical release of myofascial tension and the neurological shift from a sympathetic (fight-or-flight) to a parasympathetic (rest-and-digest) state.

The sensation of feeling “good” or relaxed is not mystical; it is a direct result of biomechanical adjustments and respiratory control.
In foundational yoga, postures that generate this relief typically focus on decompressing the spine, mobilizing the major joints (hips and shoulders) through safe ranges of motion, and facilitating deep diaphragmatic excursion. Misconceptions often lead beginners to believe that extreme flexibility or deep stretching equates to relief.
In reality, aggressive stretching triggers the stretch reflex (myotatic reflex), causing muscles to contract defensively.
To effectively relieve tension, the practitioner must focus on structural stability, mild to moderate tissue loading, and sustained, rhythmic breathing.
This approach lowers the heart rate, reduces cortisol levels, and safely restores resting muscle length, establishing a baseline for foundational movement health.
Foundational Principles for Tension-Relief Practice
Before attempting specific postures, beginners must establish a baseline understanding of movement mechanics.
The effectiveness of any tension-relieving pose relies entirely on the practitioner’s ability to coordinate breath with alignment.
-
Diaphragmatic Breathing Mechanism: Often referred to as “belly breathing,” this involves the active contraction and flattening of the diaphragm during inhalation. This action draws air into the lower lobes of the lungs and gently expands the abdominal wall, rib cage, and lower back. Diaphragmatic breathing directly stimulates the vagus nerve, signaling the nervous system to initiate a relaxation response.
-
Neutral Spine Awareness: A neutral spine maintains the natural lordotic (inward) curves of the cervical and lumbar spine, and the kyphotic (outward) curve of the thoracic spine. Many tension-relieving poses aim to restore this neutral alignment, counteracting the sustained spinal flexion (slouching) common in sedentary lifestyles.
-
Joint Centration and Stacking: Safety and comfort in yoga depend on stacking joints (e.g., shoulders over wrists in a tabletop position) to ensure weight is transferred efficiently through the skeletal structure rather than straining connective tissues or isolating small muscle groups.
-
Active vs. Passive Yielding: In restorative and tension-relieving poses, muscles are encouraged to passively yield to gravity rather than actively contract. This requires conscious mind-body awareness to identify and release involuntary muscular holding patterns, particularly in the jaw, neck, and pelvic floor.
Step-by-Step Pose Breakdown
The following postures are specifically selected for their low barrier to entry, low injury risk, and high efficacy in relieving mechanical tension and regulating the nervous system.
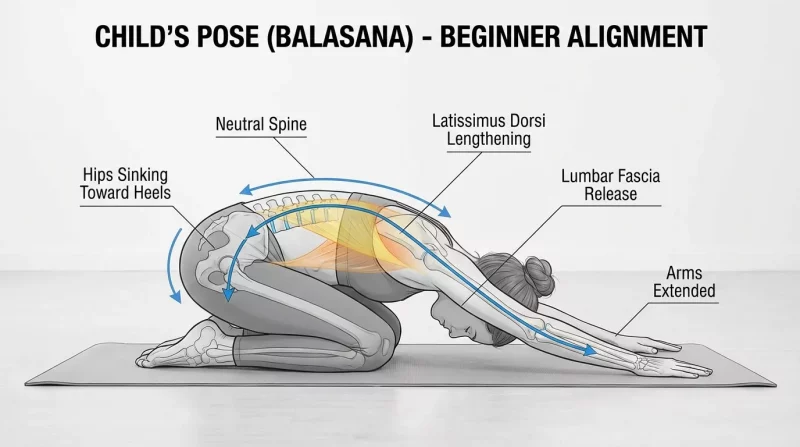
1. Child’s Pose (Balasana)
Child’s Pose is a foundational resting posture that provides passive flexion of the spine, hips, and knees while gently stretching the latissimus dorsi and lumbar fascia.
-
Starting Position: Begin in a quadruped (tabletop) position. Bring the big toes to touch and widen the knees slightly wider than hip-distance apart.
-
Alignment Cues: Exhale and hinge at the hips, sending the pelvis back to rest on the heels. Extend the arms forward, placing the palms flat on the mat, shoulder-width apart. Rest the forehead on the floor. Allow the spine to round naturally.
-
Breath Coordination: Direct the inhalation into the posterior rib cage and lumbar region. Feel the back body expand laterally and vertically. Exhale slowly, allowing the hips to sink heavier toward the heels.
-
Common Mistakes: Keeping the neck extended to look forward (straining the cervical spine); actively pulling with the shoulders rather than letting the arms rest.
-
Beginner Modifications: If the glutes do not reach the heels, place a rolled blanket or bolster between the calves and hamstrings. If the forehead does not reach the floor, rest it on a yoga block to maintain neutral cervical alignment.
-
Contraindications: Acute knee injuries (meniscus tears) or severe hip osteoarthritis.
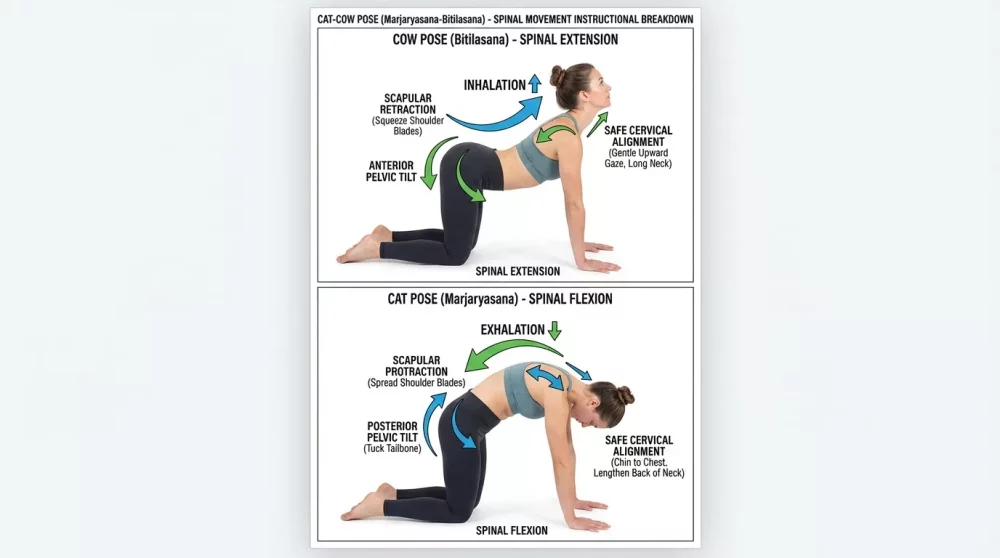
2. Cat-Cow Articulation (Marjaryasana-Bitilasana)
This is a dynamic movement pairing that mobilizes the entire vertebral column, hydrates the intervertebral discs, and establishes synchronized breath-to-movement patterns.
-
Starting Position: Tabletop position. Knees directly under the hips, wrists directly under the shoulders. Maintain a neutral spine.
-
Alignment Cues: * Cow Pose (Spinal Extension): Inhale, initiate an anterior pelvic tilt (tailbone lifts), let the belly drop toward the floor, retract the scapulae (draw shoulder blades together), and gently lift the gaze without compressing the back of the neck.
-
Cat Pose (Spinal Flexion): Exhale, initiate a posterior pelvic tilt (tuck the tailbone), draw the navel toward the spine, protract the scapulae (push the floor away, rounding the upper back), and let the crown of the head drop toward the floor.
-
-
Breath Coordination: Inhalation drives spinal extension; exhalation drives spinal flexion. The breath should dictate the pace of the movement.
-
Common Mistakes: Dumping weight into the lower back during Cow Pose rather than distributing the extension through the thoracic spine; bending the elbows to manufacture movement rather than articulating the spine.
-
Beginner Modifications: If wrists are sensitive, perform this movement on the forearms or seated in a chair.
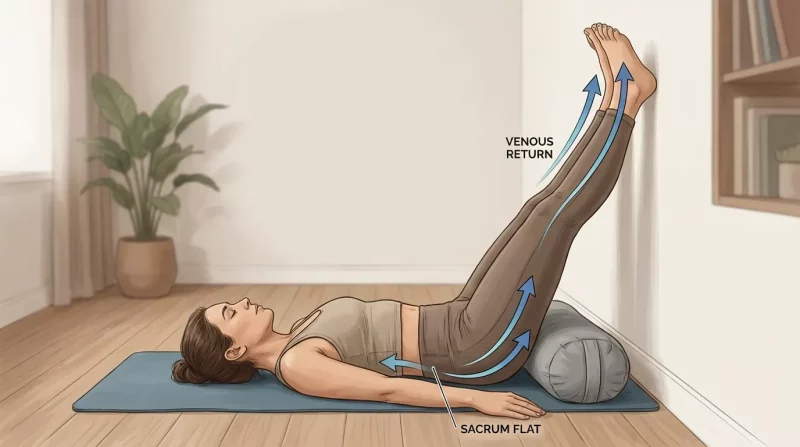
3. Legs-Up-The-Wall (Viparita Karani)
A mild, passive inversion that facilitates venous return (blood flow back to the heart), reduces lower extremity edema, and powerfully stimulates the parasympathetic nervous system.
-
Starting Position: Sit sideways with the right or left hip flush against a clear wall.
-
Alignment Cues: Gently roll onto your back while sweeping both legs up the wall. The back of the pelvis should rest heavily on the floor. Arms can rest at the sides with palms facing up, or hands can rest on the abdomen to monitor breathing.
-
Breath Coordination: Maintain a slow, continuous diaphragmatic breath pattern. Aim for an exhalation that is slightly longer than the inhalation (e.g., inhale for 4 counts, exhale for 6 counts) to deepen the neurological relaxation.
-
Common Mistakes: Forcing the hamstrings flush against the wall if they are tight, which causes the pelvis to lift off the floor and strains the lumbar spine.
-
Beginner Modifications: If the hamstrings are tight, slide the hips 3 to 6 inches away from the wall so the pelvis rests completely flat on the floor. A folded blanket can be placed under the pelvis for mild elevation.
-
Contraindications: Glaucoma, unmanaged hypertension, or severe hiatal hernia.
4. Supine Spinal Twist (Supta Matsyendrasana)
Spinal rotation helps release tension in the paraspinal muscles, the quadratus lumborum (QL), and the oblique abdominals, while also mobilizing the thoracic spine.
-
Starting Position: Lie supine (on the back) with both knees bent and feet flat on the floor.
-
Alignment Cues: Draw both knees into the chest. Extend the arms out in a “T” shape, in line with the shoulders, palms facing up. Exhale and allow both knees to fall heavily to the right side. Keep the left shoulder blade grounded on the mat.
-
Breath Coordination: Inhale to expand the left side of the ribcage. Exhale to release tension in the outer hip and waist, allowing gravity to deepen the twist passively.
-
Common Mistakes: Forcing the knees to the floor at the expense of lifting the opposite shoulder off the mat, which compromises the thoracic twist and strains the anterior shoulder capsule.
-
Beginner Modifications: Place a yoga block or bolster underneath the bottom knee, or between the two knees, to reduce the rotational demand on the lumbar spine.
-
Contraindications: Acute disc herniation or sacroiliac (SI) joint instability.
5. Supported Bridge Pose (Setu Bandhasana)
A passive backbend that opens the anterior chain (hip flexors, abdomen, chest) and reverses the biomechanical patterns of prolonged sitting.
-
Starting Position: Lie supine with knees bent, feet flat on the floor, hip-width apart. Heels should be relatively close to the glutes.
-
Alignment Cues: Press firmly into the feet to lift the pelvis. Slide a yoga block (on its lowest or medium height) directly under the sacrum—the flat, triangular bone at the base of the spine. Rest the weight of the pelvis entirely on the block. Arms rest alongside the body.
-
Breath Coordination: Breathe smoothly into the anterior ribcage and abdomen, feeling a gentle stretch across the hip flexors during the inhalation.
-
Common Mistakes: Placing the block under the lumbar spine (lower back) instead of the sacrum, which causes dangerous compression of the lumbar vertebrae; turning the head side-to-side while bearing weight on the upper back and neck.
-
Beginner Modifications: Use a firm blanket or cushion if a yoga block feels too rigid. Ensure the height of the prop matches the practitioner’s current mobility.
-
Contraindications: Recent neck or spinal injuries.
Common Beginner Mistakes and Injury Risks
In the pursuit of tension relief, beginners often inadvertently create more tension due to poor proprioception (body awareness) and a misunderstanding of how tissue adapts.
Based on practical classroom observations, these are the most prevalent errors:
-
Ignoring the Difference Between Tension and Pain: Beginners frequently push into sharp, acute joint pain, believing it is a necessary part of the “stretch.” Safe tension relief feels like a dull, broad lengthening of muscle bellies. Sharp, localized pain indicates nerve compression or joint impingement and requires immediate regression.
-
Holding the Breath Unconsciously: When faced with physical resistance or an unfamiliar posture, the natural human response is to hold the breath (the Valsalva maneuver). This spikes blood pressure and signals panic to the nervous system, negating the restorative benefits of the pose.
-
Overstretching the Hamstrings and Lower Back: In forward folds or seated positions, beginners often pull aggressively on their legs to achieve depth. This risks overstretching the hamstring attachments at the ischial tuberosity (sit bones) and can trigger lower back spasms.
-
Misalignment of the Cervical Spine: Allowing the chin to jut forward or cranking the neck to look at a screen/instructor while in a posture creates chronic cervical strain. The neck should generally follow the natural trajectory of the thoracic spine.
Safe Progression Strategy
To build a sustainable practice that continually regulates the nervous system and manages tension, beginners must apply the principle of progressive overload safely, focusing on time and consistency rather than intensity.
-
Frequency: For tension relief and nervous system regulation, frequency is more critical than duration. Practicing for 15 minutes, four to five times a week, is biomechanically and neurologically superior to a single 90-minute session once a week.
-
Duration of Holds: In tension-relieving postures (like Legs-Up-The-Wall or Supported Bridge), beginners should start with 1 to 2 minutes per pose. As tissue tolerance and mental stillness improve over weeks, holds can be progressively increased to 3 to 5 minutes.
-
When to Increase Intensity: Intensity in restorative yoga is not about stretching further; it is about utilizing fewer props. A practitioner should only remove a supportive prop (like a block under the sacrum) when they can maintain the posture with a completely neutral breath and zero joint discomfort.
-
Integrating Active Poses: Once the practitioner can reliably down-regulate their nervous system using the passive poses outlined above, they can begin slowly integrating mild active postures (like Mountain Pose or standing balances) to build foundational muscular endurance while maintaining a calm respiratory rate.
Practical Beginner Routine Example: 15-Minute Regulation Sequence
This sequence is logically structured to move the spine through its basic ranges of motion, systematically release mechanical tension, and gradually shift the nervous system into a parasympathetic state.
-
Centering (2 minutes): Lie supine with knees bent. Rest hands on the abdomen. Focus solely on establishing diaphragmatic breathing. Logic: Establishes respiratory baseline and signals safety to the nervous system.
-
Cat-Cow Articulation (2 minutes): Transition to tabletop. Perform 10-12 slow cycles. Logic: Warms the synovial fluid in the facet joints of the spine and links the newly established breath to gross motor movement.
-
Child’s Pose (3 minutes): Press hips back to heels. Use props as needed. Logic: Provides passive spinal flexion and stretches the latissimus dorsi, acting as a counter-pose to the extension found in Cow pose.
-
Supine Spinal Twist (2 minutes per side): Transition back to the back. Logic: Neutralizes the spine via rotation and releases tension in the lateral fascial lines before final rest.
-
Legs-Up-The-Wall (4 minutes): Logic: The ultimate parasympathetic trigger. Reverses venous pooling in the legs and deeply relaxes the cardiovascular system for recovery.
Transition between each posture slowly, taking at least three full breath cycles to change positions, preventing sudden orthostatic blood pressure drops (dizziness).
Optimization and Long-Term Development
Long-term success in yoga-based tension management requires a shift in perspective. Practitioners must prioritize functional mobility—the ability to actively control a joint through its range of motion—over passive flexibility.
-
Consistency Over Intensity: Muscular and fascial tissue remodel slowly. Chronic tension built up over years of poor posture will not resolve in a week. Consistent, daily application of these foundational poses trains the nervous system to maintain a lower baseline of muscular tone.
-
Recovery Considerations: These tension-relieving sequences are highly effective when used as recovery protocols following intense physical exercise (like weightlifting or running) or periods of acute psychological stress.
-
Integrating Mental Focus: As the physical mechanics of the poses become familiar, beginners can begin to optimize their practice by integrating basic mindfulness—focusing attention on the sensation of the breath at the nostrils or the physical points of contact between the body and the floor. This deepens the neurological benefits of the practice.
Professional Conclusion
Understanding how yoga poses alleviate tension requires moving beyond vague concepts of “stretching” and embracing the biomechanics of spinal alignment and the neurology of diaphragmatic breathing.
By mastering foundational postures like Child’s Pose, Supine Twists, and passive inversions, beginners can actively regulate their nervous systems and safely release mechanical holding patterns.
Long-term structural health is not built through forcing extreme ranges of motion, but through consistent, mindful movement that prioritizes stability, breath control, and progressive adaptation.
Advisory Note for Practitioners: Guidance from a qualified instructor can help refine foundational alignment and proprioception. If discomfort or sharp pain persists in any posture, reassessment of alignment is recommended before progressing further into the practice.
Beginners are encouraged to prioritize consistency, safety, and controlled breathing over the depth of any given stretch.